Hi!
One of the most interesting options that gives us Custom Vision, is the ability to export a model trained to be used on other platforms, without invoking Custom Vision own web service.
The 4 options available that we have today are
- CoreML, iOS 11
- TensorFlow, Android
- ONNX, Windows ML
- DockerFile, Azure IoT Edge, Azure Functions, AzureML
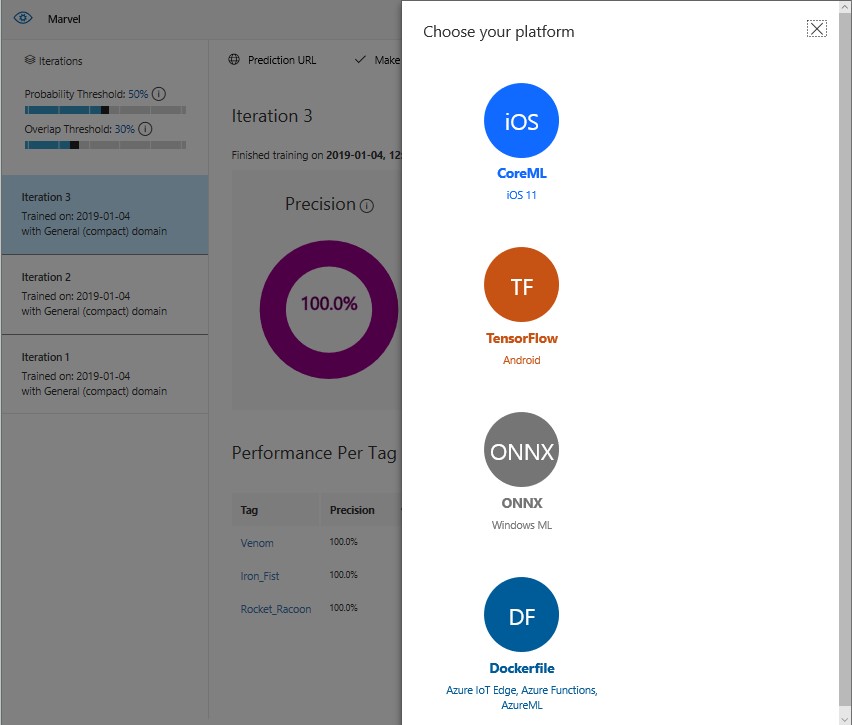
I’ll share my experiences using the ONNX exported models being used in a Windows 10 Universal App.
The first thing we have to know is the version of Windows 10 with which we will work, because at the time of export we will see that we have 2 options
- ONNX 1.0 for Windows 10 lower than 17738
- ONNX 1.2 for Windows 10 higher than 17738
I am currently working with Win10 18317, so my examples will be for the ONNX version 1.2. The exported file is a zip that internally has the following files
- CSharp\ObjectDetection.cs
- python\cntk_predict.py
- python\object_detection.py
- labels.txt
- model.onnx
The directories CSharp and Python have sample files to use the model with these languages. The file [labels.txt] contains the labels defined in the model, and finally the ONNX file is the model per se.

For this example, I will use a blank App UWP with the following features
- Added package NuGet Microsoft.Toolkit.Uwp.UI. Controls
- Using the same, to access the webcam at the beginning of the app
- We process each of the frames That are received from the webcam
Sample Code
This file contains hidden or bidirectional Unicode text that may be interpreted or compiled differently than what appears below. To review, open the file in an editor that reveals hidden Unicode characters.
Learn more about bidirectional Unicode characters
| using System; | |
| using System.Diagnostics; | |
| using Windows.UI.Xaml.Controls; | |
| using Windows.UI.Xaml.Navigation; | |
| namespace CodeMashMarvelUwp01 | |
| { | |
| public sealed partial class MainPage : Page | |
| { | |
| public MainPage() | |
| { | |
| InitializeComponent(); | |
| } | |
| protected override async void OnNavigatedTo(NavigationEventArgs e) | |
| { | |
| await CameraPreview.StartAsync(); | |
| CameraPreview.CameraHelper.FrameArrived += CameraHelper_FrameArrived; | |
| } | |
| private async void CameraHelper_FrameArrived(object sender, Microsoft.Toolkit.Uwp.Helpers.FrameEventArgs e) | |
| { | |
| if (e.VideoFrame.SoftwareBitmap == null) return; | |
| } | |
| } | |
| } |
At this point, we can now use our exported model to analyze images. We must add the file ONNX to our project, and configure the same to be a content and to be copied to the output build of our application.
An important detail here, is that if you have [Visual Studio Tools for AI] installed in Visual Studio, when you add this file the extension will automatically add a CS class to use with the model. This class requires a lot of work to work, I recommend deleting it, as we will use as a base that is exported from Custom Vision, [ObjectDetection.cs].

The file [ObjectDetection.cs] contains everything you need to use our model In a UWP App. At the start of the App we initialize the ONNX model, and in each Frame That is received from the camera will process the same to show the results in the window of Debug.
This file contains hidden or bidirectional Unicode text that may be interpreted or compiled differently than what appears below. To review, open the file in an editor that reveals hidden Unicode characters.
Learn more about bidirectional Unicode characters
| protected override async void OnNavigatedTo(NavigationEventArgs e) | |
| { | |
| InitModel(); | |
| await CameraPreview.StartAsync(); | |
| CameraPreview.CameraHelper.FrameArrived += CameraHelper_FrameArrived; | |
| } | |
| private async void CameraHelper_FrameArrived(object sender, Microsoft.Toolkit.Uwp.Helpers.FrameEventArgs e) | |
| { | |
| if (e.VideoFrame.SoftwareBitmap == null) return; | |
| try | |
| { | |
| if (_objectDetection?.Model == null) return; | |
| await LoadAndEvaluateModelAsync(e.VideoFrame); | |
| } | |
| catch (Exception exception) | |
| { Debug.WriteLine(exception); } | |
| } | |
| private ObjectDetection _objectDetection; | |
| private async void InitModel() | |
| { | |
| _objectDetection = new ObjectDetection(); | |
| var modelFile = await StorageFile.GetFileFromApplicationUriAsync(new Uri($"ms-appx:///Assets/model.onnx")); | |
| await _objectDetection.Init(modelFile); | |
| } | |
| private async Task LoadAndEvaluateModelAsync(VideoFrame videoFrame) | |
| { | |
| var result = await _objectDetection.PredictImageAsync(videoFrame); | |
| var message = $"{DateTime.Now.ToLongTimeString()}{Environment.NewLine}============================={Environment.NewLine}"; | |
| message = result.Aggregate(message, (current, predictionModel) => current + $" {predictionModel.TagName} {(predictionModel.Probability * 100.0f):#0.00}% {Environment.NewLine}"); | |
| Debug.WriteLine(message); | |
| } |
Now, for our app Work properly, you have to make a series of changes to the file [ObjectDetection.cs]. The changes are mainly related to the way in which WinML Processes the output when analyzing an image:

To be able to work this way, I added a new binding To process the output of the processing. This binding Respects the contract of ONNX with an array Long [1, 4].
This file contains hidden or bidirectional Unicode text that may be interpreted or compiled differently than what appears below. To review, open the file in an editor that reveals hidden Unicode characters.
Learn more about bidirectional Unicode characters
| public sealed class modelOutput | |
| { | |
| public TensorFloat Model_outputs0 = TensorFloat.Create(new long[] { 1, 4 }); | |
| } | |
| … | |
| public async Task<IList<PredictionModel>> PredictImageAsync(VideoFrame image) | |
| { | |
| var output = new modelOutput(); | |
| var imageFeature = ImageFeatureValue.CreateFromVideoFrame(image); | |
| var bindings = new LearningModelBinding(Session); | |
| bindings.Bind("data", imageFeature); | |
| bindings.Bind("model_outputs0", output.Model_outputs0); | |
| var result = await Session.EvaluateAsync(bindings, "0"); | |
| return Postprocess(output.Model_outputs0); | |
| } |
This way we have no mistake of those “funny” that make you spend pleasant moments.
The full app can be seen in https://github.com/elbruno/events/tree/master/2019%2001%2010%20CodeMash%20CustomVision/CSharp/CustomVisionMarvelConsole01
Happy Coding!
Greetings @ Burlington
El Bruno
References
- Custom Vision
- Quickstart: Create an image classification project with the Custom Vision .NET SDK
- Quickstart: Create an object detection project with the Custom Vision .NET SDK
- ONNX Documentation
- Sample application for ONNX1.2 models exported from Custom Vision Service
- Windows Community Toolkit
- Visual Studio Tools for AI
My Posts
Windows 10 and YOLOV2 for Object Detection Series
- Introduction to YoloV2 for object detection
- Create a basic Windows10 App and use YoloV2 in the camera for object detection
- Transform YoloV2 output analysis to C# classes and display them in frames
- Resize YoloV2 output to support multiple formats and process and display frames per second
- How to convert Tiny-YoloV3 model in CoreML format to ONNX and use it in a Windows 10 App
- Updated demo using Tiny YOLO V2 1.2, Windows 10 and YOLOV2 for Object Detection Series
- Alternatives to Yolo for object detection in ONNX format

Leave a comment