Buenas!
Una de las opciones mas interesantes que nos brinda Custom Vision, es la capacidad de exportar un modelo entrenado para ser utilizado en otras plataformas, sin invocar el servicio web propio de Custom Vision.
Las 4 opciones disponibles que tenemos hoy son
- CoreML, iOS 11
- TensorFlow, Android
- ONNX, Windows ML
- DockerFile, Azure IoT Edge, Azure Functions, AzureML
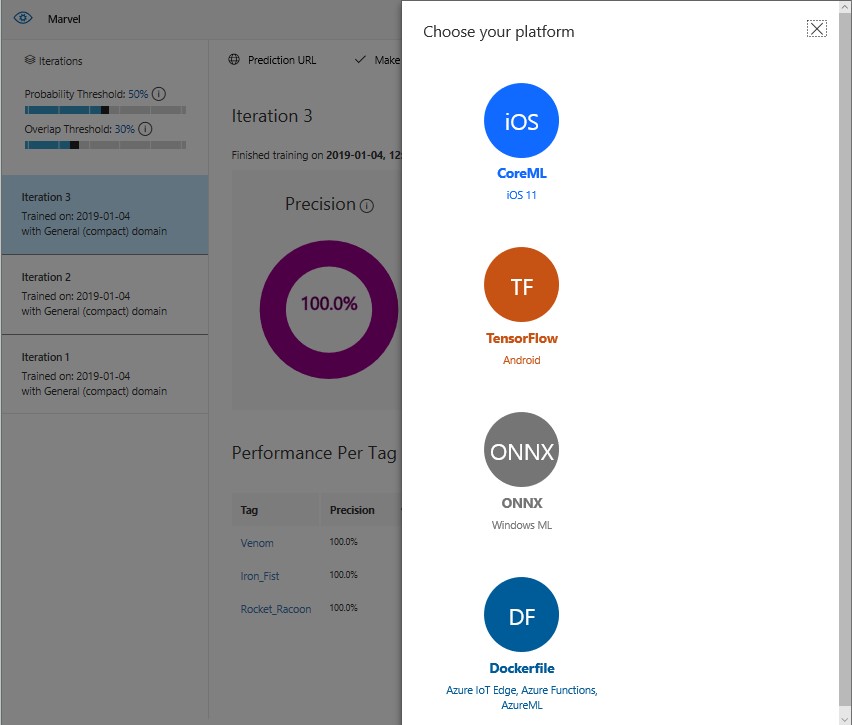
En el post de hoy comentare mi experiencia utilizando el modelo exportado a formato ONNX y siendo utilizado en una Universal App en Windows 10.
Lo primero que tenemos que conocer es la version de Windows 10 con la que trabajaremos, ya que al momento de exportar veremos que tenemos 2 opciones
- ONNX 1.0 para versiones de Windows 10 menores que 17738
- ONNX 1.2 para versiones de Windows 10 superiores a 17738
Actualmente estoy trabajando con Win10 18317, así que mis ejemplos serán para la version ONNX 1.2. El archivo exportado es un zip que internamente posee los siguientes archivos
- CSharp\ObjectDetection.cs
- python\cntk_predict.py
- python\object_detection.py
- labels.txt
- model.onnx
Los directorios CSharp y Python poseen archivos de ejemplo para utilizar el modelo con estos lenguajes. El archivo [labels.txt] posee los labels definidos en el modelo, y finalmente el archivo ONNX es el modelo.

Para este ejemplo, utilizare una UWP App en blanco con las siguientes características
- Agregado el paquete NuGet Microsoft.Toolkit.Uwp.UI.Controls
- Utilizando el mismo, para acceder a la webcam en el inicio de la app
- Procesamos cada uno de los frames que se reciben desde la webcam
Sample Code
This file contains hidden or bidirectional Unicode text that may be interpreted or compiled differently than what appears below. To review, open the file in an editor that reveals hidden Unicode characters.
Learn more about bidirectional Unicode characters
| using System; | |
| using System.Diagnostics; | |
| using Windows.UI.Xaml.Controls; | |
| using Windows.UI.Xaml.Navigation; | |
| namespace CodeMashMarvelUwp01 | |
| { | |
| public sealed partial class MainPage : Page | |
| { | |
| public MainPage() | |
| { | |
| InitializeComponent(); | |
| } | |
| protected override async void OnNavigatedTo(NavigationEventArgs e) | |
| { | |
| await CameraPreview.StartAsync(); | |
| CameraPreview.CameraHelper.FrameArrived += CameraHelper_FrameArrived; | |
| } | |
| private async void CameraHelper_FrameArrived(object sender, Microsoft.Toolkit.Uwp.Helpers.FrameEventArgs e) | |
| { | |
| if (e.VideoFrame.SoftwareBitmap == null) return; | |
| } | |
| } | |
| } |
En este momento, ya podemos utilizar nuestro modelo exportado para analizar las imágenes de las cámaras. Debemos agregar el archivo ONNX a nuestro proyecto, y configurar el mismo para que sea un contenido y para que se copie al output build de nuestra aplicación.
Un detalle importante para tener en cuenta es que si tenemos instalada [Visual Studio Tools for AI] en Visual Studio, al momento de agregar este archivo, la extensión nos agregara automáticamente una clase CS para utilizar con el modelo. Esta clase requiere bastante trabajo para funcionar, yo recomiendo borrarla, ya que utilizaremos como base la que se exporta desde Custom Vision, [ObjectDetection.cs].

El archivo [ObjectDetection.cs] contiene todo lo necesario para utilizar nuestro modelo en una UWP App. En el inicio de la App inicializaremos el modelo ONNX, y en cada Frame que se reciba de la cámara procesaremos el mismo para mostrar los resultados en la ventana de Debug.
This file contains hidden or bidirectional Unicode text that may be interpreted or compiled differently than what appears below. To review, open the file in an editor that reveals hidden Unicode characters.
Learn more about bidirectional Unicode characters
| protected override async void OnNavigatedTo(NavigationEventArgs e) | |
| { | |
| InitModel(); | |
| await CameraPreview.StartAsync(); | |
| CameraPreview.CameraHelper.FrameArrived += CameraHelper_FrameArrived; | |
| } | |
| private async void CameraHelper_FrameArrived(object sender, Microsoft.Toolkit.Uwp.Helpers.FrameEventArgs e) | |
| { | |
| if (e.VideoFrame.SoftwareBitmap == null) return; | |
| try | |
| { | |
| if (_objectDetection?.Model == null) return; | |
| await LoadAndEvaluateModelAsync(e.VideoFrame); | |
| } | |
| catch (Exception exception) | |
| { Debug.WriteLine(exception); } | |
| } | |
| private ObjectDetection _objectDetection; | |
| private async void InitModel() | |
| { | |
| _objectDetection = new ObjectDetection(); | |
| var modelFile = await StorageFile.GetFileFromApplicationUriAsync(new Uri($"ms-appx:///Assets/model.onnx")); | |
| await _objectDetection.Init(modelFile); | |
| } | |
| private async Task LoadAndEvaluateModelAsync(VideoFrame videoFrame) | |
| { | |
| var result = await _objectDetection.PredictImageAsync(videoFrame); | |
| var message = $"{DateTime.Now.ToLongTimeString()}{Environment.NewLine}============================={Environment.NewLine}"; | |
| message = result.Aggregate(message, (current, predictionModel) => current + $" {predictionModel.TagName} {(predictionModel.Probability * 100.0f):#0.00}% {Environment.NewLine}"); | |
| Debug.WriteLine(message); | |
| } |
Ahora bien, para que nuestra app funcione correctamente, hay que hacer una serie de cambios en el archivo [ObjectDetection.cs]. Los cambios están principalmente relacionados en la forma en la que WinML procesa el output cuando se analiza una imagen

Para poder trabajar de esta forma, he agregado un nuevo binding para procesar el output del procesamiento. Este binding respeta el contract de ONNX con un array Long [1, 4].
This file contains hidden or bidirectional Unicode text that may be interpreted or compiled differently than what appears below. To review, open the file in an editor that reveals hidden Unicode characters.
Learn more about bidirectional Unicode characters
| public sealed class modelOutput | |
| { | |
| public TensorFloat Model_outputs0 = TensorFloat.Create(new long[] { 1, 4 }); | |
| } | |
| … | |
| public async Task<IList<PredictionModel>> PredictImageAsync(VideoFrame image) | |
| { | |
| var output = new modelOutput(); | |
| var imageFeature = ImageFeatureValue.CreateFromVideoFrame(image); | |
| var bindings = new LearningModelBinding(Session); | |
| bindings.Bind("data", imageFeature); | |
| bindings.Bind("model_outputs0", output.Model_outputs0); | |
| var result = await Session.EvaluateAsync(bindings, "0"); | |
| return Postprocess(output.Model_outputs0); | |
| } |
De esta forma no tenemos ningún error de esos “divertidos” que te hacen pasar ratos agradables.
The full app can be seen in https://github.com/elbruno/events/tree/master/2019%2001%2010%20CodeMash%20CustomVision/CSharp/CustomVisionMarvelConsole01
Happy Coding!
Saludos @ Burlington
El Bruno
References
- Custom Vision
- Quickstart: Create an image classification project with the Custom Vision .NET SDK
- Quickstart: Create an object detection project with the Custom Vision .NET SDK
- ONNX Documentation
- Sample application for ONNX1.2 models exported from Custom Vision Service
- Windows Community Toolkit
- Visual Studio Tools for AI
My Posts
Windows 10 and YOLOV2 for Object Detection Series
- Introduction to YoloV2 for object detection
- Create a basic Windows10 App and use YoloV2 in the camera for object detection
- Transform YoloV2 output analysis to C# classes and display them in frames
- Resize YoloV2 output to support multiple formats and process and display frames per second
- How to convert Tiny-YoloV3 model in CoreML format to ONNX and use it in a Windows 10 App
- Updated demo using Tiny YOLO V2 1.2, Windows 10 and YOLOV2 for Object Detection Series
- Alternatives to Yolo for object detection in ONNX format

Leave a comment