Hi !
Yesterday I wrote about a custom solution I made to have Tap to Place feature in an Hololens App. The main set of features was
- We can perform an initial scan of an environment, based on a time constraint. Also we can continue the scan process if we don’t find a minimum of number of planes for floor or wall
- We can associate one class to an hologram to have the Tap to Place feature
- This process also allow us to validate if we can place the hologram in a vertical (wall) or horizontal (floor) plane
- The validation process also have some visual features like change the color of a box collider from red to green depending if we can or can’t place an object and also cast a shadow with the final location of the hologram
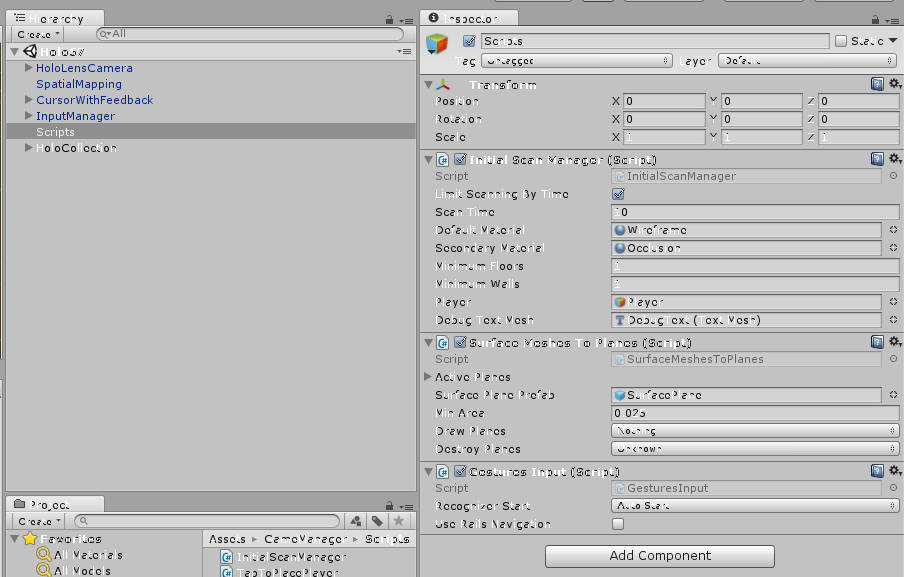
The “InitialScanManager.cs” is the one I use to perform the initial environment scan. I usually add this class to an Empty Game Object. The main properties to use are this ones:
- Limit Scanning by Time and Scan Time, definen how the scan process will be performed. If we set a Scan Time value of N, and check the Limit Scan time, the app will scan the environment for N seconds and then will stop the scan process
- Minimum Floor and Minimum Wall defines the minimum amount of frames to be searched in the floor and the wall
- Player, this is optional for the main hologram. When the scan process start it will be hide and when the scan process ends the player will be show again
- DebugTextPlayer, optional, a TextMesh used for debug actions
The class “TapToPlacePlayer.cs” is the one we must associate to the element where we want this feature. The main properties are
- Placeable Bounds and Non Placeable Bounds Materials are materials used when we start the “place mode”. I create a collider with this materials and the class change the materials based on if we can place or not the hologram at the selected position
- Placeable Shadow and Non Placeable Shadow Materials are materials used to display the final position to be placed for the hologram
- Display Shadow defines if we want to show (or not) the final position of the hologram
- Placement Surface defines the positioning mode Horizontal or Vertical. I mean Floor or Wall
- DebugTextPlayer, optional, a TextMesh used for debug actions

The complete source code can be downloaded from GitHub (link).
Greetings @ Toronto
El Bruno
References
- GitHub, HoloToolkit
- GitHub, HoloToolkit Unity
El Bruno, my posts
- How to Import the HoloToolkit Unity
- How to place a Hologram using AirTap and HoloToolkit
- Creating a menu with options with HoloToolkit
- Using voice commands to display a menu with HoloToolkit
- How to create a 3D text always visible using HoloToolkit
- How to create a HUD (3D text always visible without HoloToolkit)
- How to detect hands using HoloToolkit
- Windows 10, Xbox One Controller, Bluetooth and some lessons learned
- How to use Fire Buttons actions with an XBoxOne Controller
- HoloToolkit compiled packages for Unity3D in GitHub
- How to detect AirTap and Click actions using HoloToolkit
- Detect user hand interactions using #HoloToolkit
- Moving and rotating Holograms using an XBoxOne Controller
- Spatial Understanding vs Spatial Mapping, and a tutorial on how to use them
- Spatial Mapping, tutorial to search for simple surfaces, like a 1×1 tile on the floor
- Alternative to fix the Tap to Place and World Anchor issue, until the official release of HoloToolkit for Visual Studio 2017 and Unity3D 5.6

Leave a comment