
Hi !
I’ve been using Azure Blob Storage for a very long time. I won’t share details so you won’t laugh a lot. And now, in the amazing Azure IoT world, we have the chance to use a custom module in out Edge devices. As the documentation mention, this module is useful in scenarios:
- where data needs to be stored locally until it can be processed or transferred to the cloud. This data can be videos, images, finance data, hospital data, or any other unstructured data.
- when devices are located in a place with limited connectivity.
- when you want to efficiently process the data locally to get low latency access to the data, such that you can respond to emergencies as quickly as possible.
- when you want to reduce bandwidth costs and avoid transferring terabytes of data to the cloud. You can process the data locally and send only the processed data to the cloud.
In the references section I shared the official documentation. So, while you are reading the doc and following the steps, I’ll share some insights.
Install module from the Marketplace
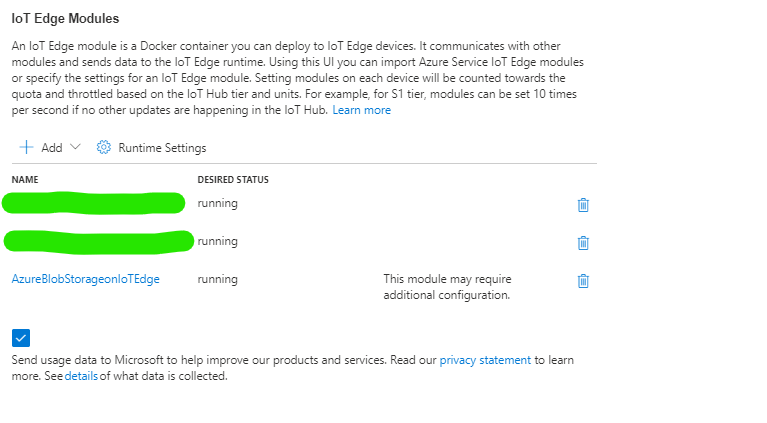
As usual, we can deploy the module using a custom JSON definition. For 1-to-1 devices, install the module from the market place is a quick option. Just go your IoT Edge device panel, select [Set Modules], and in the IoT Edge Modules section, select [+ Marketplace Module].

On the search panel, search for “storage” and check the results.
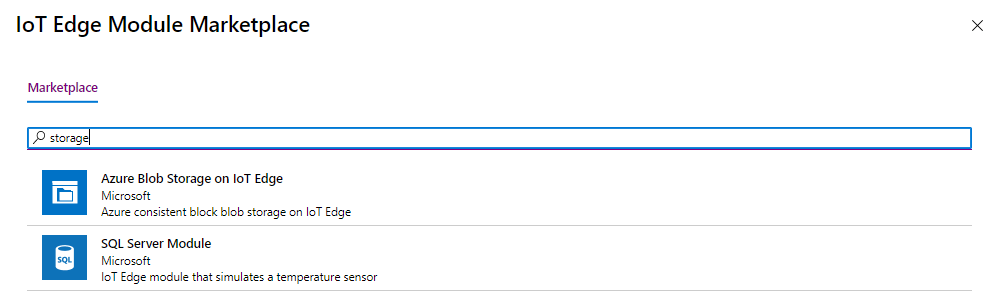
2 clicks later, the module is in your definition. However, some config is needed. I’ll go on this for next section.
Settings / Config for the Azure Blob Storage on IoT Edge module
Time for module configuration. In the official documentation describes the 2 main sections to work on.
The main values that we will need are these ones, so you may need to create / define them in advance.
- Storage account name. Account names should be 3 to 24 characters long, with lowercase letters and numbers. No spaces.
- Storage account key. Replace with a 64-byte base64 key. You can generate a key with tools like GeneratePlus. You’ll use these credentials to access the blob storage from other modules.
Environment Variables
You need to complete these values in the [Environment Variables] section.

Module Name needs to be lowecase
At some point the documentation mention / suggest to change the name to lowercase. Please do this, I had several issues on my Raspberry Pi, and somehow a lowercase name fixed some deployment issues.
Container Create Options
This section is mostly straight forward. I used the Account Name and Account Key defined in previous steps and I also created a specific folder to store the blob [/home/pi/azurestorageiot]. Again, here the documentation makes everything easy to configure.
{
  "Env":[
    "LOCAL_STORAGE_ACCOUNT_NAME=<your storage account name>",
    "LOCAL_STORAGE_ACCOUNT_KEY=<your storage account key>"
  ],
  "HostConfig":{
    "Binds":[
            "/home/pi/azurestorageiot"
    ],
    "PortBindings":{
      "11002/tcp":[{"HostPort":"11002"}]
    }
  }
}
Module Twin Settings options
Main remark here: while you are in testing mode, set the uploadOn to false (line 8). Otherwise the module will
- be installed with default options and no containers
- Search for a local container [cont1] and will log tons of errors, because the container does not exist
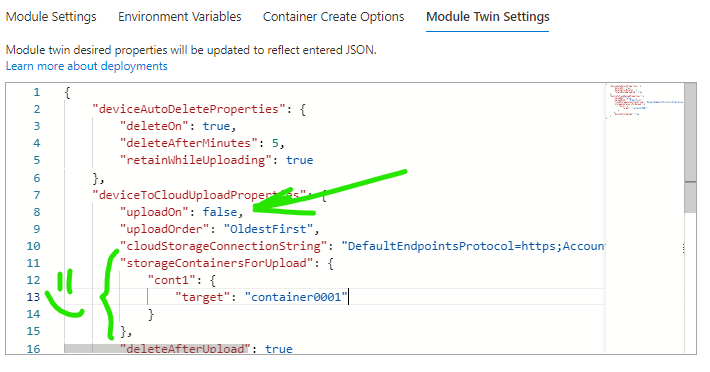
And the lines 11 to 15 were also tricky to understand. I was a expecting a source / target pair to define source and target containers, however the definition works different.
For each source container (the ones in our IoT Edge device), we need to create a section (lines 12 to 14) with the name of the IoT Edge container (cont1), and the target definition with the name of the Azure container (line 13).
Again, I spend sometime here, mostly because I was with a different mindset before understanding how this works.
And that’s it! I deployed and tested this module in a Raspberry Pi and it works like a charm!
References
Happy coding!
Greetings
El Bruno
More posts in my blog ElBruno.com.
More info in https://beacons.ai/elbruno
My posts on Raspberry Pi ⚡🐲⚡
Dev posts for Raspberry Pi
- How to grant permissions to a folder after git clone, to perform dotnet restore on a Raspberry Pi
- How to install .Net Core 3.1 in a Raspberry Pi 4
- Installing Visual Studio Code in a Raspberry Pi 4, run as root, fix black screen
- How to install .Net Core in a Raspberry Pi 4 and test with Hello World
- Build and Run C# NetCore projects in a Raspberry Pi 4 with Visual Studio Code
- Let’s do some Git dev in Raspberry Pi 4 (GitHub and Azure DevOps!)
- Install OpenCV
- Install Python 🐍 Virtual Environments in Raspberry Pi
- Setup SSH passwordless access to remote work with Docker 🐳
- Manage Docker 🐳 as a non-root user
- Build Docker 🐳 images from Visual Studio Code remotely using a Raspberry Pi
Tools and Apps for Raspberry Pi
- Where is my Task Manager in RaspberryPi? Let’s try htop
- Multi-monitor 📺 in Raspberry Pi 4 rocks !
- Double Commander on RaspberryPi4, because files are important
- How to install Docker 🐳 in a Raspberry Pi 4
- Installing Visual Studio Code in a Raspberry Pi
- Installing Visual Studio Code in a Raspberry Pi, run as root, fix black screen (Updated)
- 6 commands to install OpenCV for Python 🐍 in a Raspberry Pi 4
Setup the device
- 1st Setup without monitor 📺: auto connect to WiFi 📶, enable SSH, update and more
- Setup without monitor: enable VNC
- How to enable auto start with HDMI safe mode
- Running a Python 🐍 script in a Python Virtual Environment on reboot / startup
- Setup Wifi on Ubuntu
Hardware
- Ice Tower, the best cooler 🧊 for your device! From 70C to <40C in a 60 minutes process running at 100% in all 4 cores
- Intel Neural Stick 2, Performance differences in Face Recognition using OpenVino

¿Con ganas de ponerte al día?
En Lemoncode te ofrecemos formación online impartida por profesionales que se baten el cobre en consultoría:
- Si tienes ganas de ponerte al día con Front End (ES6, Typescript, React, Angular, Vuejs…) te recomendamos nuestros Máster Front End: https://lemoncode.net/master-frontend#inicio-banner
- Si te quieres poner al día en Backend (stacks .net y nodejs), te aconsejamos nuestro Bootcamp Backend: https://lemoncode.net/bootcamp-backend#bootcamp-backend/banner
- Y si tienes ganas de meterte con Docker, Kubernetes, CI/CD…, tenemos nuestro Bootcamp Devops: https://lemoncode.net/bootcamp-devops#bootcamp-devops/inicio

Leave a comment