Hi!
During the next couple of months, I’ll be sharing some amazing experiences around AI. Some of these experiences includes IoT devices like a Raspberry Pi, and of course some Machine Learning.Net (ML.Net). Because ML.Net is built with .Net Core, it makes sense to share the 5 simple steps you need to do to install .Net Core in a Raspberry Pi.
Of course, my 1st try was to navigate to the official .Net page (see references), which automatically detect my Linux distro and proposes a set of x64 SDKs.

I’m completely sure that I’m working in a 32 bits environment, however I’ll double check this with the following commands
sudo apt-get install lshw
lshw
After installing lshw I confirm that I’m in a 32 bit environment

Bonus: lshw is a small tool to extract detailed information on the hardware configuration of the machine. It can report exact memory configuration, firmware version, mainboard configuration, CPU version and speed, cache configuration, bus speed, etc. on DMI-capable x86 or IA-64 systems and on some PowerPC machines (PowerMac G4 is known to work).
Now I need to navigate to the download page to download the specific Linux 32-bit version (see references).
Once I got the image downloaded its time to extract the file on a specific folder. I’ve created a folder named “dotnet” with the following command
sudo mkdir -p dotnet
And to extract the image from the Downloads folder
sudo tar zxf dotnet-sdk-2.2.401-linux-arm.tar.gz -C
/home/pi/dotnet/
Let’s create a symbolic link to the extracted binaries
sudo ln -s /home/pi/dotnet/dotnet /usr/local/bin
And it’s done! Let’s invoke the .DotNet help command to test it

Now we can follow the steps of [.NET Core on Raspberry Pi, see references] to create a Console Application and to test the device.
To create a new console App
dotnet new console

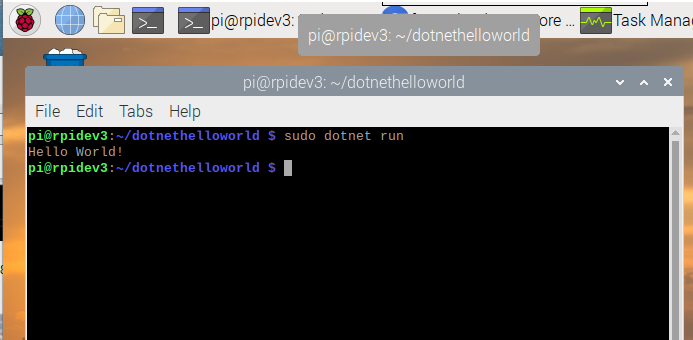
And test the app
sudo dotnet run
We can publish the app for linux / raspberry pi
sudo dotnet publish -r linux-arm
And copy the generated folder to be used in another device
./bin/Debug/netcoreapp2.2/linux-arm/

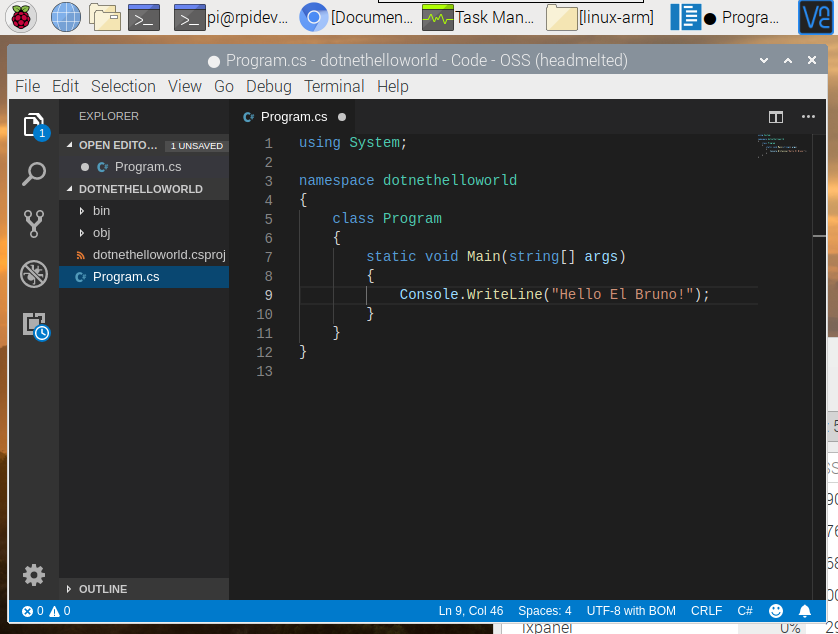
So next steps will be some other tests with Raspberry Pi and .Net Core. And the following image is a big teaser of this
Happy coding!
Greetings @ Toronto
El Bruno
References
My posts on Raspberry Pi ⚡🐲⚡
Dev posts for Raspberry Pi
- How to grant permissions to a folder after git clone, to perform dotnet restore on a Raspberry Pi
- How to install .Net Core 3.1 in a Raspberry Pi 4
- Installing Visual Studio Code in a Raspberry Pi 4, run as root, fix black screen
- How to install .Net Core in a Raspberry Pi 4 and test with Hello World
- Build and Run C# NetCore projects in a Raspberry Pi 4 with Visual Studio Code
- Let’s do some Git dev in Raspberry Pi 4 (GitHub and Azure DevOps!)
- Install OpenCV
- Install Python 🐍 Virtual Environments in Raspberry Pi
- Setup SSH passwordless access to remote work with Docker 🐳
- Manage Docker 🐳 as a non-root user
- Build Docker 🐳 images from Visual Studio Code remotely using a Raspberry Pi
Tools and Apps for Raspberry Pi
- Where is my Task Manager in RaspberryPi? Let’s try htop
- Multi-monitor 📺 in Raspberry Pi 4 rocks !
- Double Commander on RaspberryPi4, because files are important
- How to install Docker 🐳 in a Raspberry Pi 4
- Installing Visual Studio Code in a Raspberry Pi
- Installing Visual Studio Code in a Raspberry Pi, run as root, fix black screen (Updated)
- 6 commands to install OpenCV for Python 🐍 in a Raspberry Pi 4
Setup the device
- 1st Setup without monitor 📺: auto connect to WiFi 📶, enable SSH, update and more
- Setup without monitor: enable VNC
- How to enable auto start with HDMI safe mode
- Running a Python 🐍 script in a Python Virtual Environment on reboot / startup
- Setup Wifi on Ubuntu

Leave a comment