Latest version 2024-Dec-13 here
Hi!
Ok, let’s assume you did the tutorial and installed the latest raspbian image in an SD card. If you want to access and control remotely your device you may want to follow this steps.
Configure Wireless connection
In the SD Card, you need to create a file named [wpa_supplicant.conf] in the root of the SD card with the following information:
country=ca
update_config=1
ctrl_interface=/var/run/wpa_supplicant

network={
 scan_ssid=1
 ssid=" Your WiFi SSID"
 psk="You amazing password"
}
The file content is very straight forward to understand. Main values to complete are [ssid] and [psk].
Once you put the SD card in the device and start the device, it will automatically connect to the configured WiFi.
Enable SSH
If you also want to enable SSH, you need to create a blank file named [ssh] to the main partition.
Once you put the SD card in the device and start the device, it will automatically enable the SSH service.
Find the IP address in your network
And that’s it, your Raspberry Pi will be connected to the Wifi and with SSH enabled. At this moment we can use a tool like AngryIp (see references) to detect the new device in the network

My new device IP is: 192.168.1.246
Access via SSH
I used to like Putty to connect to my device, however during the past months I’ve been using Windows Terminal and Powershell. In order to access the device I need to execute the command
ssh user@deviceaddress
and my data is
- user: pi
- ip: 192.168.1.246
- password: raspberry

You can now start working with your Raspberry Pi !
Change Password
The default password for the device is “raspberry”, and as usual, it’s recommended to change it. In order to do this, in the ssh terminal, let’s access to the device configuration
sudo raspi-config
This will open the configuration for the device.
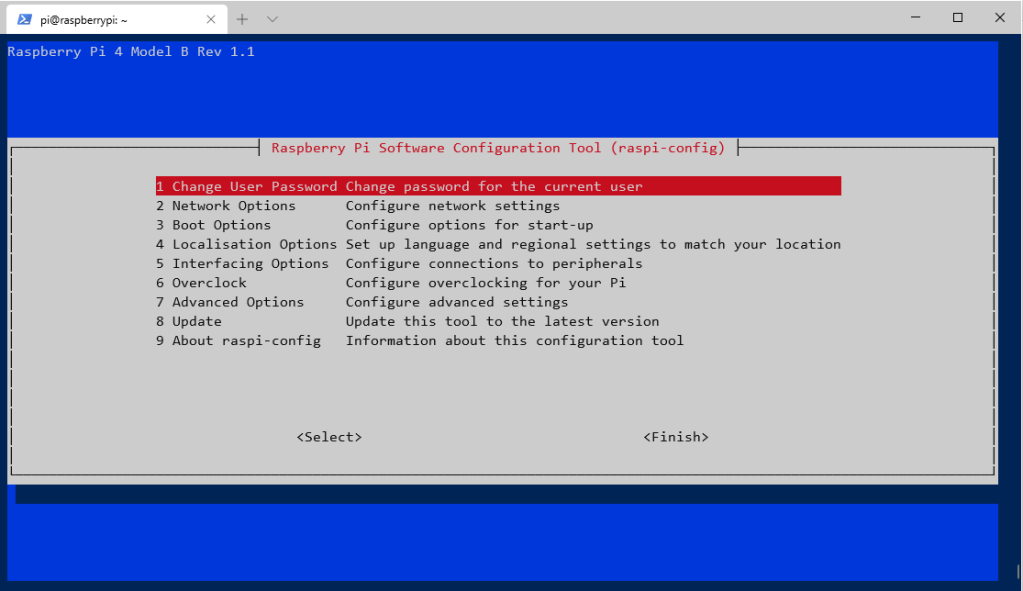
Option number 1 will allow us to change the password.
Rename the device
In the same Raspberry configuration tool, we can rename the hostname that our device will use for network operations.
Select the options
- Network Options
- Hostname
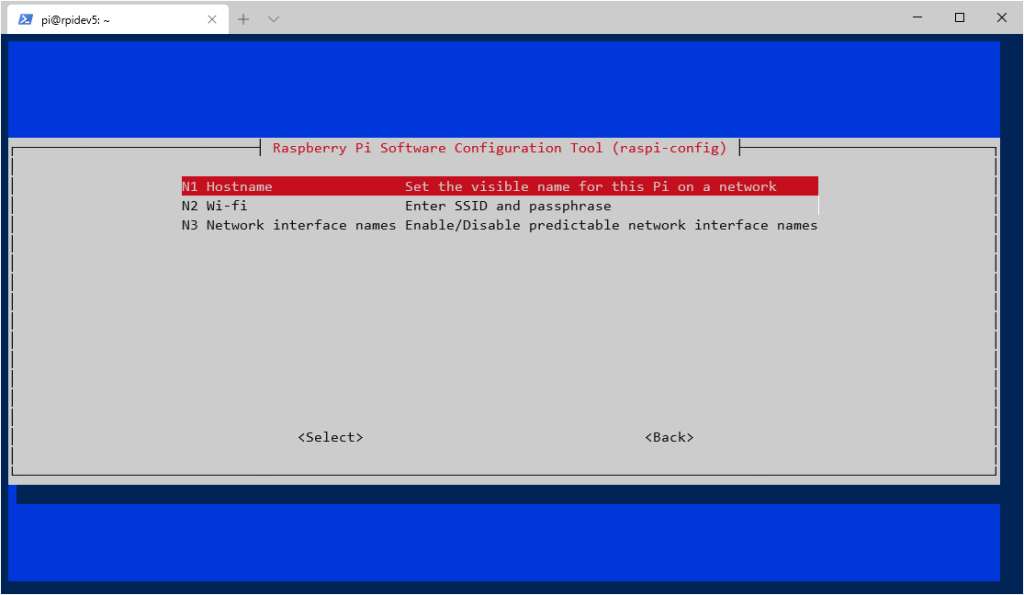
And define the new name for the Raspberry Pi device.
Expand FileSystem
Another important option in the configuration is to expand the SD disk.In the same configuration screen, select
- 7. Advanced Options
- Expand File System

Now we need to reboot and after the reboot the file system should have been expanded to include all available space on your micro-SD card. Reboot with the command
sudo reboot
Update the device
Of course, at this moment you should change your default password and update everything with a command like this one
sudo -- sh -c 'apt-get update; apt-get upgrade -y; apt-get dist-upgrade -y; apt-get autoremove -y; apt-get autoclean -y'
Conclusion
And that’s it, we have our device updated and running with the latest software versions and we didn’t use a monitor! I’ll update this post frequently to make it relevant with my personal best practices.
Happy coding!
Greetings
El Bruno
More posts in my blog ElBruno.com.
More info in https://beacons.ai/elbruno
References
- Raspberry Pi, Download Raspbian https://www.raspberrypi.org/downloads/raspbian/
- Raspberry Pi, Installing the Image https://www.raspberrypi.org/documentation/installation/installing-images/README.md
- AngryIP https://angryip.org/
My posts on Raspberry Pi ⚡🐲⚡
Dev posts for Raspberry Pi
- How to grant permissions to a folder after git clone, to perform dotnet restore on a Raspberry Pi
- How to install .Net Core 3.1 in a Raspberry Pi 4
- Installing Visual Studio Code in a Raspberry Pi 4, run as root, fix black screen
- How to install .Net Core in a Raspberry Pi 4 and test with Hello World
- Build and Run C# NetCore projects in a Raspberry Pi 4 with Visual Studio Code
- Let’s do some Git dev in Raspberry Pi 4 (GitHub and Azure DevOps!)
- Install OpenCV
- Install Python 🐍 Virtual Environments in Raspberry Pi
- Setup SSH passwordless access to remote work with Docker 🐳
- Manage Docker 🐳 as a non-root user
- Build Docker 🐳 images from Visual Studio Code remotely using a Raspberry Pi
Tools and Apps for Raspberry Pi
- Where is my Task Manager in RaspberryPi? Let’s try htop
- Multi-monitor 📺 in Raspberry Pi 4 rocks !
- Double Commander on RaspberryPi4, because files are important
- How to install Docker 🐳 in a Raspberry Pi 4
- Installing Visual Studio Code in a Raspberry Pi
- Installing Visual Studio Code in a Raspberry Pi, run as root, fix black screen (Updated)
- 6 commands to install OpenCV for Python 🐍 in a Raspberry Pi 4
Setup the device
- 1st Setup without monitor 📺: auto connect to WiFi 📶, enable SSH, update and more
- Setup without monitor: enable VNC
- How to enable auto start with HDMI safe mode
- Running a Python 🐍 script in a Python Virtual Environment on reboot / startup
- Setup Wifi on Ubuntu

Leave a comment