
Coding4Fun Drone 🚁 posts
- Introduction to DJI Tello
- Analyzing Python samples code from the official SDK
- Drone Hello World ! Takeoff and land
- Tips to connect to Drone WiFi in Windows 10
- Reading data from the Drone, Get battery level
- Sample for real time data read, Get Accelerometer data
- How the drone camera video feed works, using FFMPEG to display the feed
- Open the drone camera video feed using OpenCV
- Performance and OpenCV, measuring FPS
- Detect faces using the drone camera
- Detect a banana and land!
- Flip when a face is detected!
- How to connect to Internet and to the drone at the same time
- Video with real time demo using the drone, Python and Visual Studio Code
- Using custom vision to analyze drone camera images
- Drawing frames for detected objects in real-time in the drone camera feed
- Save detected objects to local files, images and JSON results
- Save the Drone camera feed into a local video file
- Overlay images into the Drone camera feed using OpenCV
- Instance Segmentation from the Drone Camera using OpenCV, TensorFlow and PixelLib
- Create a 3×3 grid on the camera frame to detect objects and calculate positions in the grid
- Create an Azure IoT Central Device Template to work with drone information
- Create a Drone Device for Azure IoT Central
- Send drone information to Azure IoT Central
- Using GPT models to generate code to control the drone. Using ChatGPT
- Generate code to control the 🚁 drone using Azure OpenAI Services or OpenAI APIs, and Semantic Kernel
Hi !
In my previous post, I shared an example where I analyzed the camera feed using a Image Recognition model created using Custom Vision. Today I’ll expand the sample, and show in real time the detected MVPs logos with a frame in the drone camera feed.
Let’s take a look at the demo working in the following image.
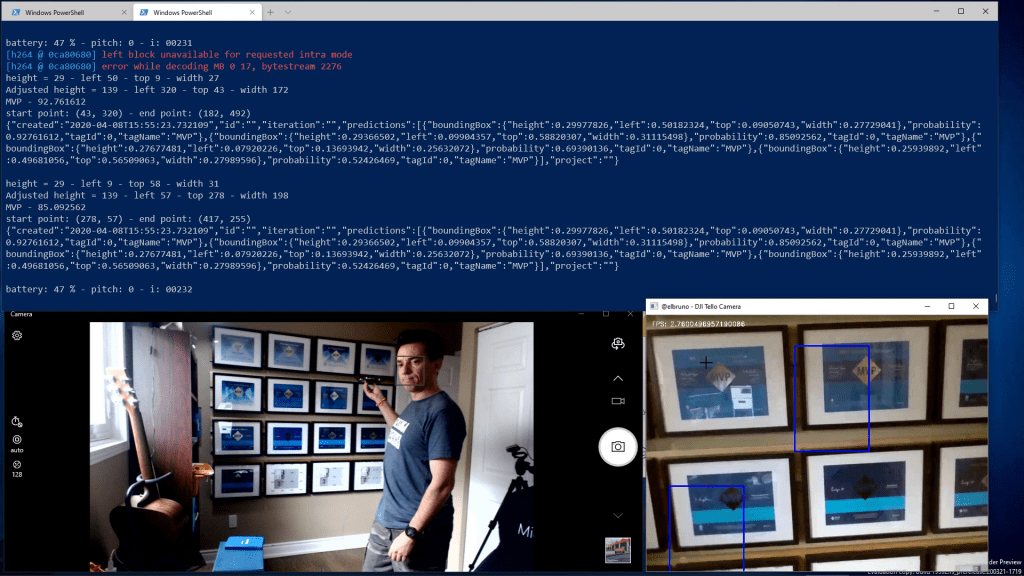
In the top of the image, we can see the app console log, with the information received for each analyzed frame. When an image is detected, we can see the tag, the probability and the bounding box coordinates.
A sample JSON return string start like this one:
{
  "created": "2020-04-08T17:22:02.179359",
  "id": "",
  "iteration": "",
  "predictions": [
    {
      "boundingBox": {
        "height": 0.1979116,
        "left": 0.3235259,
        "top": 0.05847502,
        "width": 0.20438321
      },
      "probability": 0.89171505,
      "tagId": 0,
      "tagName": "MVP"
    },
    {
      "boundingBox": {
        "height": 0.2091526,
        "left": 0.65271178,
        "top": 0.0433814,
        "width": 0.17669522
      },
      "probability": 0.70330358,
      "tagId": 0,
      "tagName": "MVP"
    },
In order to position the frames in the correct location, I need to make some math using the current camera and image size and the returned bounding box values for, height, left, top and width. Lines 87-110.
resize_factor = 100

height = int(bb['height'] * resize_factor)
left = int(bb['left'] * resize_factor)
top = int(bb['top'] * resize_factor)
width = int(bb['width'] * resize_factor)

# adjust to size
camera_Width,
height = int(height * camera_Heigth / 100)
left = int(left * camera_Width / 100)
top = int(top * camera_Heigth / 100)
width = int(width * camera_Width / 100)

# draw bounding boxes
start_point = (top, left)
end_point = (top + height, left + width)
color = (255, 0, 0)
thickness = 2
cv2.rectangle(img, start_point, end_point, color, thickness)
So let’s go to the full code:
And if you want to see this up and running, it’s much better to see this in a video (start at ):
The complete source code can be found here https://github.com/elbruno/events/tree/master/2020%2004%2018%20Global%20AI%20On%20Tour%20MTY%20Drone%20AI%20Mex
Happy coding!
Greetings
El Bruno
More posts in my blog ElBruno.com.
More info in https://beacons.ai/elbruno

Leave a comment