Hi!
So today post is not a post, just a selfish reminder of the steps I do when I setup a new dev machine
- Install Anaconda (see references). I use the default settings, and important: I don’t add Anaconda to Windows PATH.
- Open Anaconda command prompt as administrator
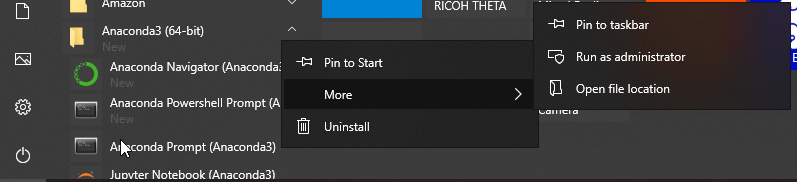
Need to be open as Admin in order to install updates
- Install updates with the command
conda update conda
conda update –all
- Create a new development environment named “tfEnv” with tensorflow. Activate the environment
conda create -n tfenv tensorflow
conda activate tfenv
- The command to install keras is
pip install
keras
However, if it doesn’t work, I install keras with the following packages
pip install matplotlib
pip install pillow
pip install tensorflow==1.14
conda install mingw libpython
pip install git+git://github.com/Theano/Theano.git
pip install git+git://github.com/fchollet/keras.git
- Finally, install Jupyter notebook kernel and create a new kernel for the current virtual environment
pip install ipykernel
ipython kernel install --user --name=tfEnv
- There seems to be an issue to install OpenCV using pip with the command
pip install
opencv-python
So, I Install the OpenCV nonofficial package. 1st I download a compatible package from
https://www.lfd.uci.edu/~gohlke/pythonlibs/#pyopencl
Install with
pip install
c:\temp\opencv_python-4.1.1-cp36-cp36m-win_amd64.whl
Happy coding!
Greetings @ Toronto
El Bruno
References
- Anaconda distribution https://www.anaconda.com/distribution/
- El Bruno, Can’t install TensorFlow on Anaconda, maybe is the Visual Studio distribution https://elbruno.com/2019/09/09/python-cant-install-tensorflow-on-anaconda-maybe-is-the-visual-studio-distribution/
- El Bruno, Anaconda, How to create a custom #Python virtual environment and use it in #Jupyter notebooks (a kernel!) https://elbruno.com/2019/09/10/anaconda-how-to-create-a-custom-python-virtual-environment-and-use-it-in-jupyter-notebooks-a-kernel/

Leave a comment