Hi !
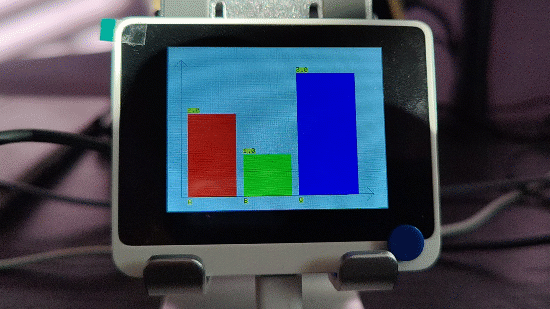
One of the amazing libraries we have to work with the Wio Terminal is one to create charts. And with, only 20 lines of code (or maybe more), we can create a simple app like this one with 3 bars, and every time you press one Button in the Wio Terminal, the bar value will increase.
Source Code
In order to code this, we need to work with a specific library to draw chats. The library is available here, as I explained in my previous post, you need to download and install the library via the Arduino IDE. I mean, you can also copy the files using a file explorer, but that’s topic for another post.
So, the full code is below and some notes
- The counter values for buttons A, B and C are initialized in lines 11 to 13.
- I added a special delay of 0.5 seconds, after a button is pressed. Otherwise, the loop may increase a lot the buttons values.
- The histogram library allows to update a single bar. I was expecting a full screen refresh, and this was a nice surprise.
Simple code. And now, with chart features available, I can start to work with Data !!!
Happy coding!
Greetings
El Bruno
More posts in my blog ElBruno.com.
More info in https://beacons.ai/elbruno
References
- Download Arduino IDE
- Wiki Seeed – Historgram
- Wiki Seeed – loading Images
- Seeed – Installing the File System Library

¿Con ganas de ponerte al día?
En Lemoncode te ofrecemos formación online impartida por profesionales que se baten el cobre en consultoría:
- Si tienes ganas de ponerte al día con Front End (ES6, Typescript, React, Angular, Vuejs…) te recomendamos nuestros Máster Front End: https://lemoncode.net/master-frontend#inicio-banner
- Si te quieres poner al día en Backend (stacks .net y nodejs), te aconsejamos nuestro Bootcamp Backend: https://lemoncode.net/bootcamp-backend#bootcamp-backend/banner
- Y si tienes ganas de meterte con Docker, Kubernetes, CI/CD…, tenemos nuestro Bootcamp Devops: https://lemoncode.net/bootcamp-devops#bootcamp-devops/inicio
WioTerminal – Posts to interact with a Digital Twin Door 🚪 with Azure IoT ☁️ and Azure Functions
- Convert and use images on the device
- 1st steps 👣, developer steps
- Buttons and Charts time 📊📉📊
- Connecting to Wifi 📶, display local IP and get ready for Azure ☁️ scenarios
- Getting JSON data from an Azure ☁️ Function
- Parsing JSON data from an Azure ☁️ Function
- Display a Digital Twin Door 🚪 state using XBitmap with Azure IoT ☁️
- Display a countdown progress bar 🚥 for the next Azure IoT ☁️ refresh data call
- Open and close the Digital Twin Door 🚪 using the Wio Terminal Buttons
- Training an 🗣️ audio recognition module. Record 🎙️ audio samples for training
- Training an 🗣️ audio recognition module. Edge Impulse for Arduino step-by-step and optimizations
- Training an 🗣️ audio recognition module. Running the model on the device
- Playing sound on the open and close events from the Digital Twin Door 🚪 (coming soon)

Leave a comment