Hi !
In my previous series of posts I wrote about how to create custom modules to work using Custom Vision projects, and also sensors in a Raspberry Pi. Today, I’ll pick my Door demo, and share some insights about how to work work with Twin properties.
Define Twin Properties
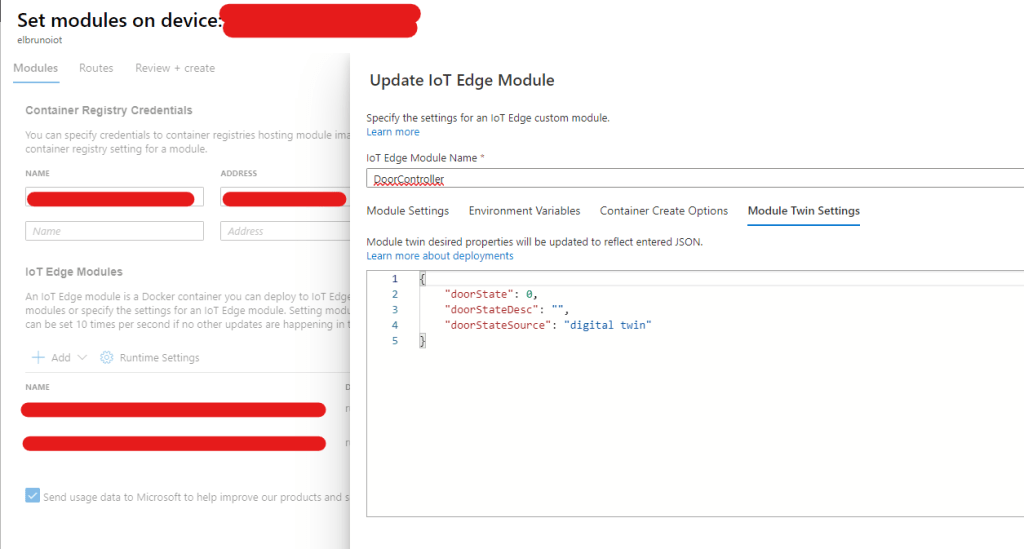
Let’s start defining our twin properties. We can do this in our Visual Studio project, adding the information to the [deployment.template.json] file. Or, we can also do this on the module definition, on the Azure IoT Portal.
Once we are setting the module properties, we can add the necessary information in the [Module Twin Settings] tab.
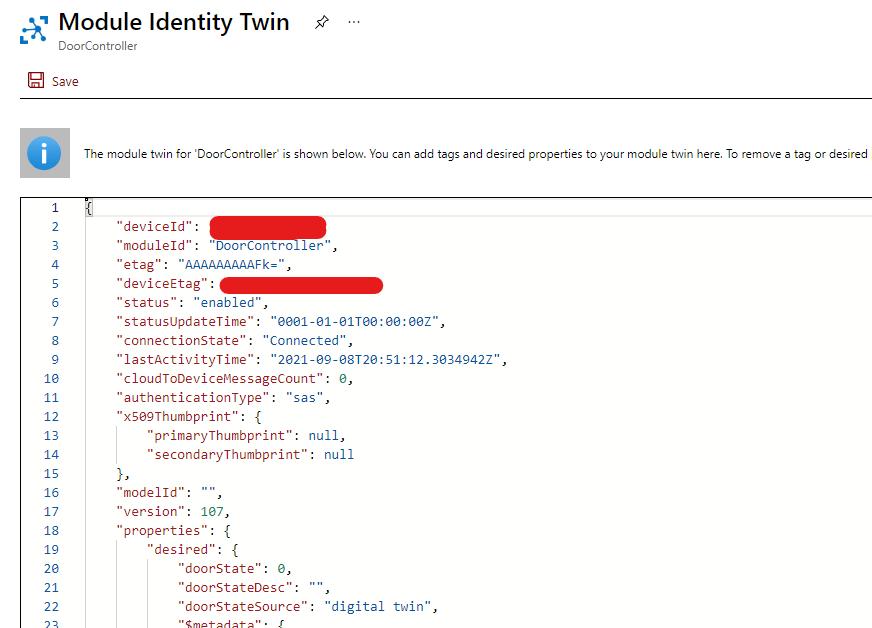
Once the module is success fully deployed, we can access to the twin properties and check the desired and reported states.
Reading Digital Twin properties changes
Now it’s time to create a new thread.. In this thread, we will check for changes in the Digital Twin properties and work with those changes. The following code is based on the references suggested code.
- Code will iterate and check the DT changes every N seconds
- When changes are received, the code will get specific values for door state and door state description
The printed log is similar to the following sample:
2021-09-08 20:51:10.836744 | Twin patch received - loops : 23
2021-09-08 20:51:10.837610 | {'doorState': 0, 'doorStateDesc': '', 'doorStateSource': 'digital twin', '$version': 89}
2021-09-08 20:51:10.837690 |  New Door state : 0 - source : digital twin
2021-09-08 20:51:10.837727 | start close - source digital twin
2021-09-08 20:51:12.240233 | start send message
Updating Twin properties
In order to update twin properties, we can use the following code as reference.
On the Module definition, we can check the reported properties.

References
- Use Visual Studio Code to develop and debug modules for Azure IoT Edge
- Understand and use module twins in IoT Hub
Happy coding!
Greetings
El Bruno
More posts in my blog ElBruno.com.
More info in https://beacons.ai/elbruno
Azure ☁ IoT
- Install ☁ Azure IoT on Raspberry Pi
- Deploy ☁ Azure Blob Storage on IoT Edge, lessons learned
- Connect to ☁ Azure Blob Storage on IoT Edge using Microsoft Azure Storage Explorer
- Lesson learned and tips on how to install Azure IoT Edge on Ubuntu on a Raspberry Pi
- Azure IoT Explorer, in preview and awesome
- Mapping a local ☁ Azure IoT Edge folder module with an Edge device folder 📁
- Creating a folder 📂 in the docker definition in an ☁ Azure IoT Edge
- Granting access to Raspberry Pi GPIO from an ☁ Azure IoT Edge Module
Create an Azure IoT Module using Raspberry Pi and Grove Sensors
- Raspberry Pi + Grove Sensors, read temperature and humidity values
- Raspberry Pi + Grove Sensors, send temperature and humidity values as telemetry to Azure IoT Hub
- Raspberry Pi + Grove Sensors, create a Azure IoT Module to send temperature and humidity values as telemetry to Azure IoT Hub
- Raspberry Pi + Grove Sensors, publish and use the Azure IoT Module
- Raspberry Pi + Grove Sensors, notes on build and configuration
- Raspberry Pi + Grove Sensors, details on how to send a telemetry message and sample messages
Create an Azure IoT Module from Azure Custom Vision project
- Create and export a Custom Vision Project as Docker image
- Analyze the content of the CV Docker image
- Create and analyze an Azure IoT Module
- Merge the CV project as an Azure IoT Module
- Deploy to an Azure IoT device and test the CV module
- Send telemetry for each analyzed image
- Add digital twin configuration to the Azure IoT module (coming soon)

¿Con ganas de ponerte al día?
En Lemoncode te ofrecemos formación online impartida por profesionales que se baten el cobre en consultoría:
- Si tienes ganas de ponerte al día con Front End (ES6, Typescript, React, Angular, Vuejs…) te recomendamos nuestros Máster Front End: https://lemoncode.net/master-frontend#inicio-banner
- Si te quieres poner al día en Backend (stacks .net y nodejs), te aconsejamos nuestro Bootcamp Backend: https://lemoncode.net/bootcamp-backend#bootcamp-backend/banner
- Y si tienes ganas de meterte con Docker, Kubernetes, CI/CD…, tenemos nuestro Bootcamp Devops: https://lemoncode.net/bootcamp-devops#bootcamp-devops/inicio

Leave a comment