

Hi !
Windows Terminal (WT) is one of the coolest tools I’ve using in the last couple of years. I’m not an expert, and not even a fan of CLIs, however I assume working with WT is super cool.
Bonus: If you speak Spanish, I shared my own thoughts about this with Juan and Eduard in a podcast episode here.
On top of this, I also use Anaconda a lot. And, now that we can launch and use Anaconda from a PowerShell Prompt, I think I should spend some time trying to figure out how to have Anaconda inside Windows Terminal.
I will assume that you know the basis of Windows Terminal profiles. As a WT user, we can create as many profiles as we want to have different tools available. This is my starting point to use Anaconda and Windows Terminal.
Note: Check References for Donovan Brown post about working with profiles.
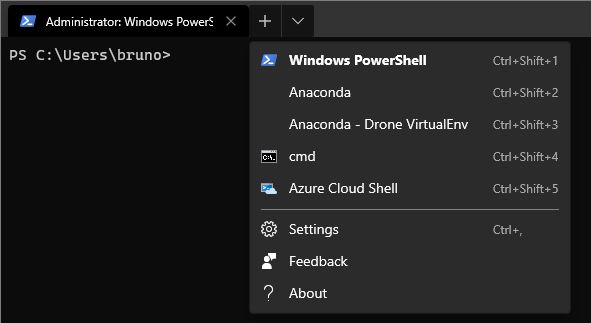
Create a new profile to launch Anaconda in Windows Terminal
Let’s go to Windows Terminal Settings to create a new profile for Anaconda. In order to do this, I’ll copy and paste an existing profile, update the Guid and complete the following values.
- guid: create and paste a new Guid
- name: I defaulted this to Anaconda
- commandline: this is the tricky one. So I’ll describe the steps below.
I browse to [C:\ProgramData\Microsoft\Windows\Start Menu\Programs\Anaconda3 (64-bit)] and view the properties for the [Anaconda PowerShell Prompt]. Then copy the Target value and use the value in the commandline element.

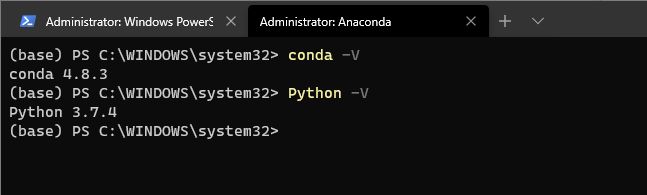
That should be enough to have a new profile to work with Anaconda. When we open a new tab for Anaconda, we can see that it open the standard virtual environment (base).
1st step done, have Anaconda integrated with Windows Terminal !
Start an Anaconda Virtual Environment in a new Windows Terminal Tab
Moving on, I’ll create and activate a new Virtual Environment named [drone], with the following commands.
conda create -n drone pip python=3.7
conda activate drone
Now I have a new environment named [drone], and I want to have a shortcut in Windows Terminal to open a new tab with this VirtualEnv activated. I copy & paste the definition of the Anaconda profile, used a new Guid, and added, the following command to the end of the line:
conda activate drone

As you can see in the previous image, when I open a new tab for my Drone Virtual Env, I already have it loaded. I also added a [cls] command at the end, so I can start with a clean environment.
Finally, and for reference, this is my current Windows Terminal settings file including the 2 Anaconda profiles.
Happy coding!
Greetings
El Bruno
More posts in my blog ElBruno.com.
More info in https://beacons.ai/elbruno
References
- Windows Terminal, https://github.com/Microsoft/Terminal
- Donovan Brow, How to add profiles to the new Windows Terminal

Leave a comment