Hi !
Still learning with the ESP32 CAM board.
In today’s post the scenario is simple:
- Init the camera
- Take a photo
- Save the photo to the SD card
As the previous sample, I’ll write this using Visual Studio Code and PlatformIO project, using the AI Thinker ESP-32CAM board.
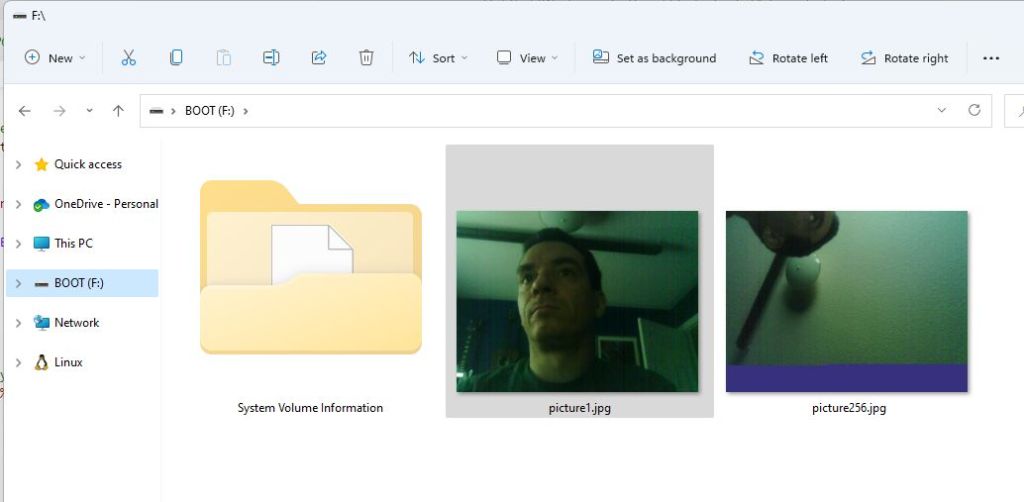
And yes, demo here is tricky, so let me share the current content of the SD Card.
As usual, the full sample code is in the demo repository.
Let’s review some noted from the code:
- My include section contains several files to work with the camera, with the SD Card, File System and the Pins to use the camera.
#include "WiFi.h"
#include "esp_camera.h"
#include "esp_timer.h"
#include "img_converters.h"
#include "Arduino.h"
#include "soc/soc.h"          // Disable brownour problems
#include "soc/rtc_cntl_reg.h" // Disable brownour problems
#include "driver/rtc_io.h"
#include <ESPAsyncWebServer.h>
#include <StringArray.h>
#include "FS.h"     // SD Card ESP32
#include "SD_MMC.h" // SD Card ESP32
#include <EEPROM.h> // read and write from flash memory

// define the number of bytes you want to access
#define EEPROM_SIZE 1

// Photo File Name to save in SPIFFS
#define FILE_PHOTO "/photo.jpg"

// OV2640 camera module pins (CAMERA_MODEL_AI_THINKER)
#define PWDN_GPIO_NUM 32
#define RESET_GPIO_NUM -1
#define XCLK_GPIO_NUM 0
#define SIOD_GPIO_NUM 26
#define SIOC_GPIO_NUM 27
#define Y9_GPIO_NUM 35
#define Y8_GPIO_NUM 34
#define Y7_GPIO_NUM 39
#define Y6_GPIO_NUM 36
#define Y5_GPIO_NUM 21
#define Y4_GPIO_NUM 19
#define Y3_GPIO_NUM 18
#define Y2_GPIO_NUM 5
#define VSYNC_GPIO_NUM 25
#define HREF_GPIO_NUM 23
#define PCLK_GPIO_NUM 22
#define FLASH_GPIO_NUM 4

// ledPin refers to ESP32-CAM GPIO 4 (flashlight)
#define FLASH_GPIO_NUM 4
- First of all we need to init the camera.
void initCamera()
{
  // Turn-off the 'brownout detector'
  WRITE_PERI_REG(RTC_CNTL_BROWN_OUT_REG, 0);

  // OV2640 camera module
  camera_config_t config;
  config.ledc_channel = LEDC_CHANNEL_0;
  config.ledc_timer = LEDC_TIMER_0;
  config.pin_d0 = Y2_GPIO_NUM;
  config.pin_d1 = Y3_GPIO_NUM;
  config.pin_d2 = Y4_GPIO_NUM;
  config.pin_d3 = Y5_GPIO_NUM;
  config.pin_d4 = Y6_GPIO_NUM;
  config.pin_d5 = Y7_GPIO_NUM;
  config.pin_d6 = Y8_GPIO_NUM;
  config.pin_d7 = Y9_GPIO_NUM;
  config.pin_xclk = XCLK_GPIO_NUM;
  config.pin_pclk = PCLK_GPIO_NUM;
  config.pin_vsync = VSYNC_GPIO_NUM;
  config.pin_href = HREF_GPIO_NUM;
  config.pin_sscb_sda = SIOD_GPIO_NUM;
  config.pin_sscb_scl = SIOC_GPIO_NUM;
  config.pin_pwdn = PWDN_GPIO_NUM;
  config.pin_reset = RESET_GPIO_NUM;
  config.xclk_freq_hz = 20000000;
  config.pixel_format = PIXFORMAT_JPEG;

  if (psramFound())
  {
    config.frame_size = FRAMESIZE_UXGA;
    config.jpeg_quality = 10;
    config.fb_count = 2;
  }
  else
  {
    config.frame_size = FRAMESIZE_SVGA;
    config.jpeg_quality = 12;
    config.fb_count = 1;
  }
  // Camera init
  esp_err_t err = esp_camera_init(&config);
  if (err != ESP_OK)
  {
    Serial.printf("Camera init failed with error 0x%x", err);
    ESP.restart();
  }
}
And them add a function to take a photo 📸.
// Capture Photo and Save it to SD card
void capturePhotoSaveSD(void)
{
  camera_fb_t *fb = NULL; // pointer
  fb = esp_camera_fb_get();
  if (!fb)
  {
    Serial.println("Camera capture failed");
    return;
  }

  // initialize EEPROM with predefined size
  EEPROM.begin(EEPROM_SIZE);
  photoCount = EEPROM.read(0) + 1;

  // Path where new picture will be saved in SD Card
  String path = "/picture" + String(photoCount) + ".jpg";

  fs::FS &fs = SD_MMC;
  Serial.printf("Picture file name: %s\n", path.c_str());

  File file = fs.open(path.c_str(), FILE_WRITE);
  if (!file)
  {
    Serial.println("Failed to open file in writing mode");
  }
  else
  {
    file.write(fb->buf, fb->len); // payload (image), payload length
    Serial.printf("Saved file to path: %s\n", path.c_str());
    EEPROM.write(0, photoCount);
    EEPROM.commit();
  }
  file.close();
  esp_camera_fb_return(fb);
}
And, the full test app will init the camera, take 2 photos and save them to the SD Card.
void setup()
{
  Serial.begin(9600);
  // initialize the flash light pin as an output:
  pinMode(FLASH_GPIO_NUM, OUTPUT);
  initCamera();
  flash(1);
  capturePhotoSaveSD();
  flash(1);
  capturePhotoSaveSD();
  flash(1);
}

void loop()
{
  delay(100);
}
I need to work a little more with some elements here, however, this is becoming a fun and interesting solution.
Full code available in my ESP32 Cam Demo repository.
Happy coding!
Greetings
El Bruno
More posts in my blog ElBruno.com.
More info in https://beacons.ai/elbruno

Leave a comment