Hi !
Yesterday, I shared a very simple project created with PlatformIO Labs in Visual Studio Code for a Wio Terminal. If you are used to work with the Arduino IDE, there are a couple of notes here that may help.
Let’s start with a very simple program:
Check RTL8720 Firmware Version
This program is based on the “Check RTL8720 Firmware Version from Arduino IDE” section on the official SeeedStudio Wiki on how to “Update the Wio Terminal Wireless Core Firmware“.
Once you updated the firmware, you need to install these dependencies in the Arduino IDE
- Seeed_Arduino_rpcWiFi – search for “seeed rpcwifi”
- Seeed_Arduino_rpcUnified – search for “seeed rpcunified”
- Seeed_Arduino_mbedtls – search for “seeed mbedtls”
- Seeed_Arduino_FS – search for “seeed fs”
- Seeed_Arduino_SFUD – search for “seeed sfud”
And then build and upload this program.
#include "rpcWiFi.h"
void setup() {
    Serial.begin(115200);
    while(!Serial); // Wait to open Serial Monitor
    Serial.printf("RTL8720 Firmware Version: %s", rpc_system_version());
}
void loop() {}
Super simple. Let’s see how we can do this with PlatformIO.
Check RTL8720 Firmware Version with Platform IO
Let’s create a new project using the Project Wizard.

Empty project created, let’s check the code.
First difference is in the main.cpp file, we can see that this file includes the <Arduino.h> file. This is tricky, we may need to add all the necessary Arduino code files to build. More on this later 😁.

Let’s add the dependencies. We have 2 ways to do this:
On the PlatformIO portal, we can add a new section to our project where we will define the libraries to be downloaded and used when the project is built.

Once this secion is added we can start to search and add our libraries.

Once we add our 5 libraries, this section will look like something like this.

The 2nd way to do this is to edit the [platformio.ini] file and add / edit this changes in text mode. Once you are familiar with the file structure, this is a super gast way to do this.

Ok, now it’s time to update the code. I leave the include for the <Arduino.h> header, and added the sample code.

1st Build failed. 😢😢😢
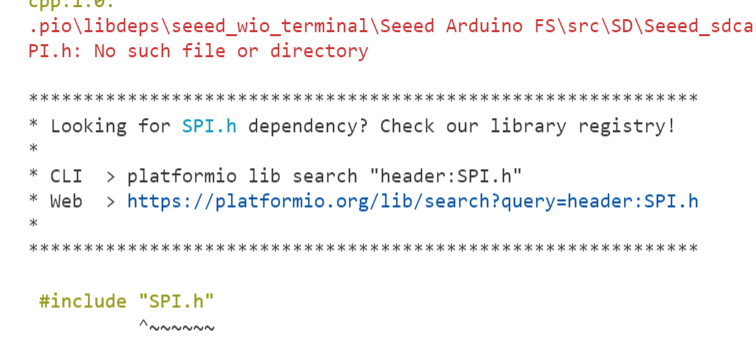
I may probably explain a lot here about how the Arduino / microprocessor compiler works, however, it’s kind of late so I’ll just share the solution.
Include the SPI.h in our main code.
SPI is part of the core processor, we don’t need any extra dependency, we just need the compiler to have this file already there (line 3).
#include <Arduino.h>
#include <rpcWiFi.h>
#include <SPI.h>

void setup() {
    Serial.begin(115200);
    while(!Serial); // Wait to open Serial Monitor
    Serial.printf("RTL8720 Firmware Version: %s", rpc_system_version());
}

void loop() {
}
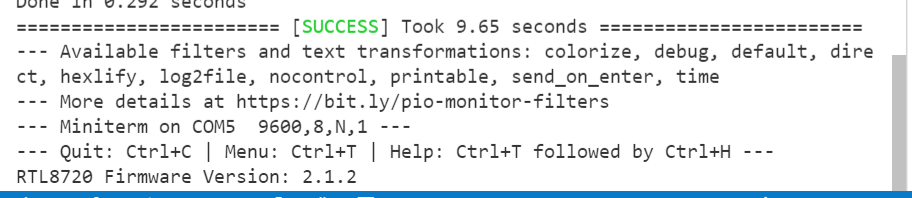
Once the project is build and uploaded, we can see the output in the terminal monitor.
You can check the complete code here.
https://github.com/elbruno/Blog/tree/main/20211209%20Check%20RTL%208720%20Firmware%20Version
Happy coding!
Greetings
El Bruno
More posts in my blog ElBruno.com.
More info in https://beacons.ai/elbruno

Leave a comment