
Hi !
There is a new scenario available in ML.Net Model Builder for Visual Studio 2019: Object Detection. This scenario is not just image tagging, this scenario allows us to detect objects in an image, and get the specific coordinates and size of the detected objects. As usual, it requires a starting data set with images and labels.
Model Builder Object Detection
This one is super helpful and is also very easy to use. Let’s start with the 1st step
Add a new Machine Learning element in a Visual Studio project, and select Object Detection scenario.

This scenario only supports Azure training environment. Lucky me, I already have a Azure ML environment up and running (see references for my previous posts).
Next step is to define the data source for the scenario. In order to do this, we need to define an Image Labeling format file. The suggested tool to do this is VoTT (see references). You need to install the local version for VoTT. As far as I understand, for this Model Builder scenario, it only support VoTT projects using local files.
Define Source Images and Labels
For this post, I created a sample project using Fresh Food labels. Just 4
- apple
- apple rotten
- banana
- banana rotten
Important: The source connection will define the path where for the source images that will be used for labeling. Target connection defines the project location and also the path for the project exported file.

Once we defined our project properties, we can start defining tags and labeling our objects in the project images. This is a manual process, and it can be tedious.
Important: VoTT support custom detailed areas as the ones you see in the image below. For the Model Builder Scenario, these custom areas will be transformed into standard rectangles.

At any moment, you can save and export your project. This will generate a new folder in the [Target Connection] location named [vott-json-export]. In this folder we can find all the used and labeled images and also the exported JSON file that we will use on Visual Studio.

This is sample content of the exported file:
{
    "name": "MLNet Fresh Food",
    "securityToken": "MLNet Fresh Food Token",
    "videoSettings": {
        "frameExtractionRate": 15
    },
    "tags": [
        {
            "name": "apple_rotten",
            "color": "#5db300"
        },
        {
            "name": "apple",
            "color": "#e81123"
        },
        {
            "name": "banana",
            "color": "#6917aa"
        },
        {
            "name": "banana_rotten",
            "color": "#015cda"
        }
    ],
    "id": "uF6EQo2eX",
    "activeLearningSettings": {
        "autoDetect": false,
        "predictTag": true,
        "modelPathType": "coco"
    },
    "version": "2.2.0",
    "lastVisitedAssetId": "27f36f1bbeb5abc8a505d677931d8e1d",
    "assets": {
        "27f36f1bbeb5abc8a505d677931d8e1d": {
            "asset": {
                "format": "png",
                "id": "27f36f1bbeb5abc8a505d677931d8e1d",
                "name": "bananarotten08.png",
                "path": "file:C:/ML/FreshFood/mlnet/bananarotten08.png",
                "size": {
                    "width": 568,
                    "height": 298
                },
                "state": 2,
                "type": 1
            },
            "regions": [
                {
                    "id": "VVg0KLN6d",
                    "type": "RECTANGLE",
                    "tags": [
                        "banana_rotten"
                    ],
                    "boundingBox": {
                        "height": 158.57173447537474,
                        "width": 470.0359550561798,
                        "left": 21.26011235955056,
                        "top": 24.248394004282655
                    },
                    "points": [
                        {
                            "x": 21.26011235955056,
                            "y": 24.248394004282655
                        },
                        {
                            "x": 491.29606741573036,
                            "y": 24.248394004282655
                        },
                        {
                            "x": 491.29606741573036,
                            "y": 182.8201284796574
                        },
                        {
                            "x": 21.26011235955056,
                            "y": 182.8201284796574
                        }
                    ]
                }
            ],
            "version": "2.2.0"
        },
Back again in Visual Studio, we can select this file as the INPUT Json file for our scenario.

Train the Model
Everything is ready, let’s train the model, using Azure Compute ;D
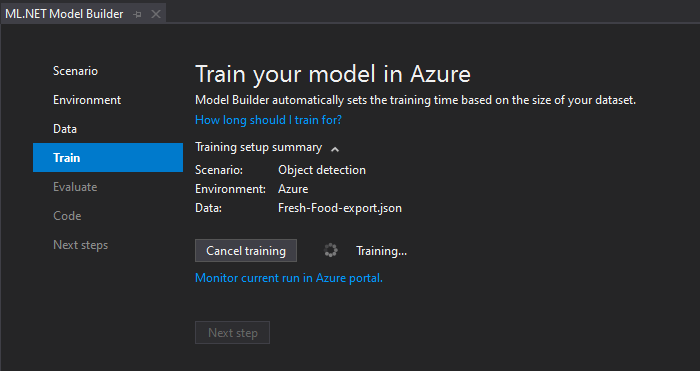
The process is similar to the Image Classification scenario, it all start uploading the sources images to a Blob in Azure, and then launch 4 Azure ML Experiments
- AutoML
- Preparation
- Script
- HyperDrive
Once the process is complete, we can also check output metrics like Precision and Accuracy. This one is not the best model, however I consider this a great starting point for my demo blog.
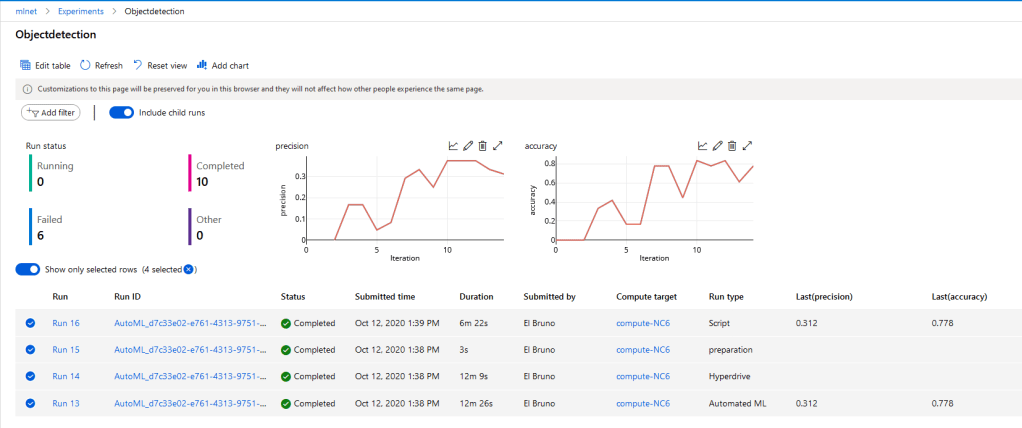
If you want to know more about Azure ML, this is an great opportunity to play around with these experiments. The Script Experiment (Run 16 in the image) has a lot to dig, like the complete output log, some training python files, the generated ONNX model, and more.

Test and consume the generated Model
Back to Visual Studio we can check the model metrics and also the Best Model (I have so many questions here!).

And we can test the generated model. As you can see in the next images, using a threshold with value 50, the results are good. Still not detecting the rotten apple with the good ones, so I maybe need to figure out some strategies to improve my model.


Remember that all these features are still in preview, however they are an amazing starting point and tool to use and learn.
Happy coding!
Greetings
El Bruno
More posts in my blog ElBruno.com.
More info in https://beacons.ai/elbruno
Resources
- VoTT
- VoTT Releases
- ML.NET Model Builder GPU vs CPU test: 4 times faster !
- MLNet – AutoML for ranking scenarios
- ML.NET Model Builder GPU Support (Preview)
- ML.NET Model Builder training using GPU, CPU and … Azure !
- How to install GPU support in Model Builder
- August ML.NET API and Tooling Updates
- State Farm Distracted Driver Detection
- How to Train TensorFlow Models Using GPUs

Leave a comment