Windows 10 and YOLOV2 for Object Detection Series
- Introduction to YoloV2 for object detection
- Create a basic Windows10 App and use YoloV2 in the camera for object detection
- Transform YoloV2 output analysis to C# classes and display them in frames
- Resize YoloV2 output to support multiple formats and process and display frames per second
Hi!
Now we already have downloaded the YoloV2 ONNX file. We can create an UWP App to use the model. Here’s the step by step and some comments
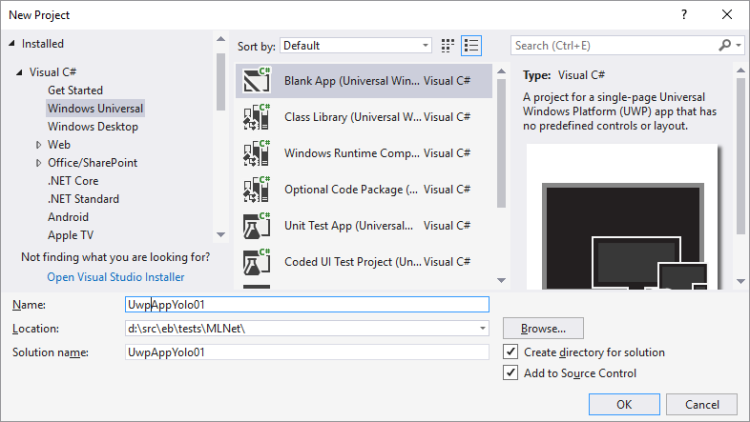
1. We create a new Windows 10 UWP App. As always the name is super original
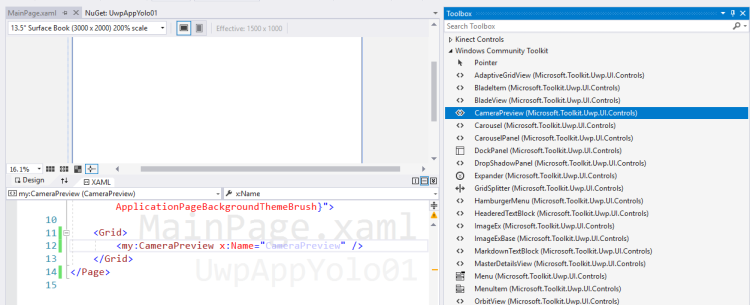
2. We are going to use the camera as images source to be processed with YoloV2. There are many examples of how to do this. In this case we will use a control of Windows Community Toolkit V 3.0 (as I wrote in a previous post). We add the following Packages Via NuGet
- Microsoft.Toolkit.Uwp.UI
- Microsoft.Toolkit.Uwp.UI.Controls

3. We add a control CameraPreview In our Xaml and we’re already 2 lines away of having the camera working.
4. We enable the necessary permissions to use the camera in the app manifest. With The following lines our app have a functional camera
This file contains bidirectional Unicode text that may be interpreted or compiled differently than what appears below. To review, open the file in an editor that reveals hidden Unicode characters.
Learn more about bidirectional Unicode characters
| using Windows.UI.Xaml.Controls; | |
| using Windows.UI.Xaml.Navigation; | |
| namespace UwpAppYolo01 | |
| { | |
| public sealed partial class MainPage : Page | |
| { | |
| public MainPage() | |
| { | |
| InitializeComponent(); | |
| } | |
| protected override async void OnNavigatedTo(NavigationEventArgs e) | |
| { | |
| await CameraPreview.StartAsync(); | |
| CameraPreview.CameraHelper.FrameArrived += CameraHelper_FrameArrived; | |
| } | |
| private void CameraHelper_FrameArrived(object sender, Microsoft.Toolkit.Uwp.Helpers.FrameEventArgs e) | |
| { | |
| } | |
| } | |
| } |

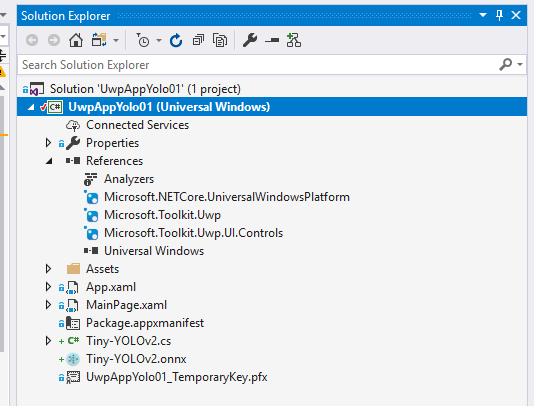
5. The time has come to start using YoloV2. The latest versions of Visual Studio 2017 allow us to import an ONNX model into a project and the IDE will create the classes needed to work with it. We add as an existing file to the file [Tiny-YOLOv2. Onnx].
Our solution should be similar to the following
6. The class that is generated in VS to work with the model It’s pretty ugly.
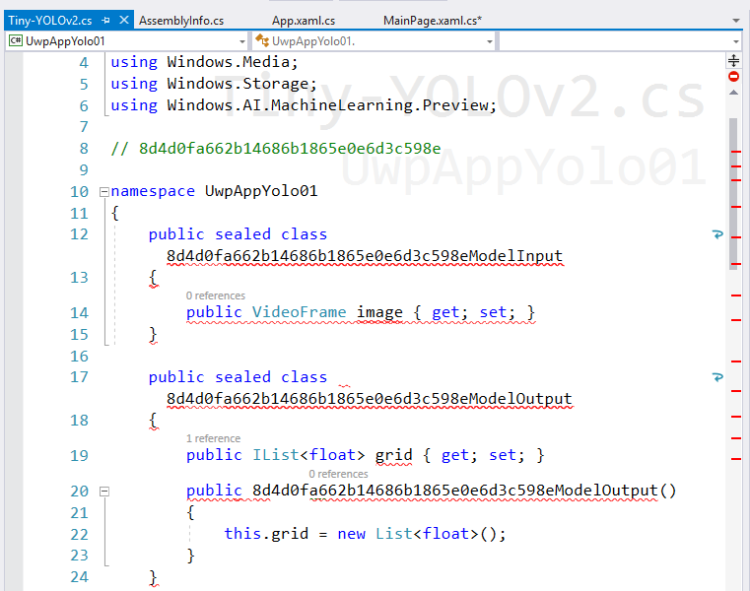
7. My suggestion, replace [8d4d0fa662b14686b1865e0e6d3c598eByTinyYoloV2]
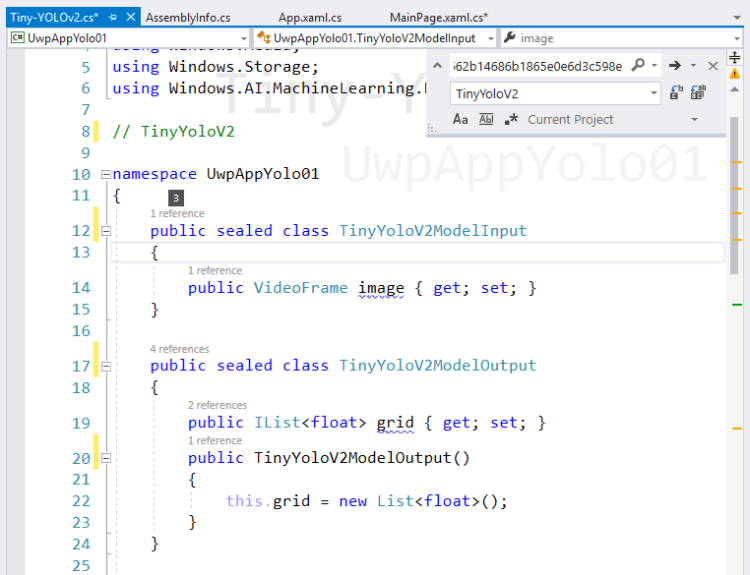
8. Now we can see the generated class and within it we can find 3 classes
- An Input class for the Model
- An Output class for the Model
- A class to work with the Model
It’s time to load the model into our App. We do this before initializing the camera as shown in the following Code
This file contains bidirectional Unicode text that may be interpreted or compiled differently than what appears below. To review, open the file in an editor that reveals hidden Unicode characters.
Learn more about bidirectional Unicode characters
| using System; | |
| using Windows.UI.Xaml.Controls; | |
| using Windows.UI.Xaml.Navigation; | |
| namespace UwpAppYolo01 | |
| { | |
| public sealed partial class MainPage : Page | |
| { | |
| private TinyYoloV2Model _model; | |
| public MainPage() | |
| { | |
| InitializeComponent(); | |
| } | |
| protected override async void OnNavigatedTo(NavigationEventArgs e) | |
| { | |
| LoadYoloOnnxModel(); | |
| await CameraPreview.StartAsync(); | |
| CameraPreview.CameraHelper.FrameArrived += CameraHelper_FrameArrived; | |
| } | |
| private async void LoadYoloOnnxModel() | |
| { | |
| var file = await Windows.Storage.StorageFile.GetFileFromApplicationUriAsync(new Uri("ms-appx:///Tiny-YOLOv2.onnx")); | |
| _model = await TinyYoloV2Model.CreateTinyYoloV2Model(file); //, | |
| } | |
| private void CameraHelper_FrameArrived(object sender, Microsoft.Toolkit.Uwp.Helpers.FrameEventArgs e) | |
| { | |
| } | |
| } | |
| } |
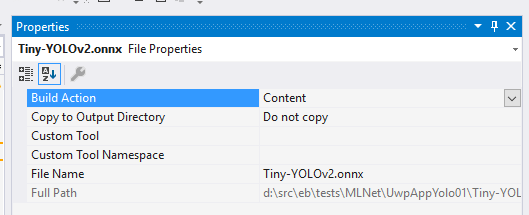
9. Because we will use the model as part of our App, we have to define that it be treated as a Content in the process of Build
10. The next step is to evaluate a Frame Of the camera with the YOLOV2 model. Here the code shows us how we use the classes we create when we import the model.
This file contains bidirectional Unicode text that may be interpreted or compiled differently than what appears below. To review, open the file in an editor that reveals hidden Unicode characters.
Learn more about bidirectional Unicode characters
| private async void CameraHelper_FrameArrived(object sender, Microsoft.Toolkit.Uwp.Helpers.FrameEventArgs e) | |
| { | |
| if (e?.VideoFrame?.SoftwareBitmap == null) return; | |
| var input = new TinyYoloV2ModelInput {image = e.VideoFrame}; | |
| var output = await _model.EvaluateAsync(input); | |
| Debug.WriteLine(output.grid.ToString()); | |
| } |
11. Finally a Break Point is an useful way to show the output of the model and the information of the model output, which we will have to process later.
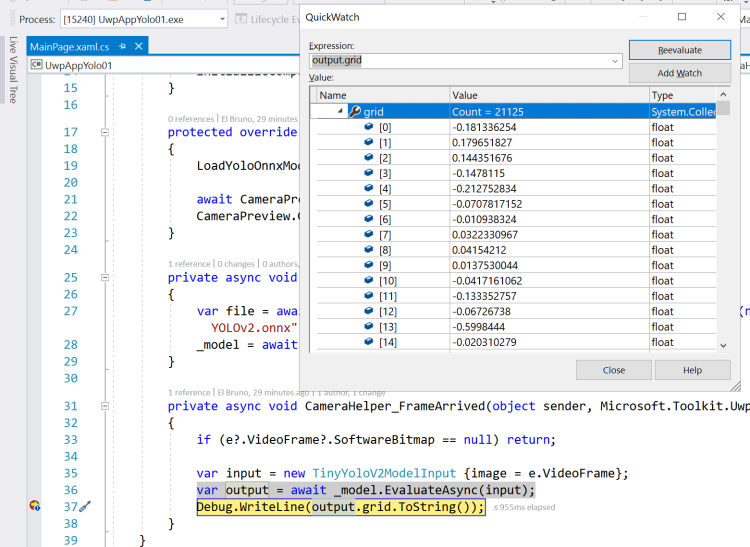
Well, at this point we are already using the model YoloV2 to analyze the frames of the camera. In the following posts I’ll write on how to work with the output of the model to get information which makes sense to us!
Important: At some point I should write about the model conversion capabilities that Visual Studio Tools brings to us For AI.
Happy Coding!
Greetings @ Toronto
El Bruno
References
- YOLO: Real-time object detection
- YOLO9000: Better, Faster, Stronger by Joseph Redmon and Ali Farhadi (2016)
- ONNX Tools
- Azure AI Gallery, Tiny YOLO V2
- El Bruno, Windows Community Toolkit V 3.0 makes life incredibly easy if you need working with the camera in a UWP App
- Visual Studio Marketplace, Visual Studio Tools for AI

Hi El Bruno,
Excellent tutorial.
Between steps #3 and #4, I cannot seem to initialize my Camera as I am receiving red error lines under CameraPreview in my MainPage.xaml.cs script:
await CameraPreview.StartAsync();
CameraPreview.CameraHelper.FrameArrived += CameraHelper_FrameArrived;
Also, I see a difference in the MainPage.xaml code for the CameraPreview grid:
Do you know what my issue may be?
Cheers,
Jason
LikeLiked by 1 person
Fixed it in the MainPage.xaml.cs script:
protected override async void OnNavigatedTo(NavigationEventArgs e)
{
LoadYoloOnnxModel();
await CameraPreviewControl.StartAsync();
CameraPreviewControl.CameraHelper.FrameArrived += CameraHelper_FrameArrived;
}
Here is the code for the XAML:
LikeLiked by 1 person
Hi Jason, thanks for the tips!
BTW, in the final post I’ve shared the complete UWP App
https://github.com/elbruno/Blog/tree/master/20180704%20UwpMLNetYolo
regards
LikeLike
Hi El Bruno,
That’s great! Many thanks.
Cheers,
Jason
LikeLike
Hi elbruno,
I have a problem with adding Tiny-YOLOv2.cs file into my project. Actually, when I add another YOLO file there is no problem and the .cs file will be added automatically. But, when I wanna try the one you recommended, The .cs file does not show up automatically. Can please let me know what the problem can be?
Thanks
LikeLike
Have you check that the file is not there? check the file system and delete the cs file before adding the yolo file !
LikeLike
Here is the xaml code for the grid:
LikeLiked by 1 person
I guess I’m missing something but even form your github I have a NullReferenceException with a null learning model on EvaluateAsync line in FrameArrived method, any clue ?
LikeLiked by 1 person
It may depend on the W10 version and the ONNX version you are using.
Can you check this?
LikeLike
Unable to load the Tiny-YOLOv2.onnx in Visual Studio 2017 i get the error:
Tiny-YOLOv2.onnx -l CS -n VanUI -t VS_Marketplace’ failed with exit code 1
mlgen failed: Node:batchnorm Required attribute ‘consumed_inputs’ is missing.
LikeLike
Hi,
I’m not a specialist in VS and I’m having a hard time to understand what do you mean by “We add as an existing file to the file [Tiny-YOLOv2. Onnx].” I add the onnx file to my project but the .cs file is not created automatically. I’m using Visual Studio Community 2017, Version 15.9.16.
Thank you very much.. your post has been very useful to me,
Dania
LikeLike
Hi Dania
Do you have installed Visual Studio Tools for AI ?
https://marketplace.visualstudio.com/items?itemName=ms-toolsai.vstoolsai-vs2017
As far as I remember, this extension is the one who add the cs files to work with the ONNX model
regards!
LikeLike